Monday 30 May 2016

Parachute

Today, we met and completed our parachute. After having finished sewing, we decided to add to the central hole several small ones. They are arranged circular around the central hole as this model of a round canopy parachute appears to have the best flight stability.

As there is no drag coefficent for parachutes of this design a calculation of the exact size of the parachute and the holes was not possible. Therefore, we developed a testing concept for measuring the air resistance with an air velocoty of 11 m/s.


Within the test, we drove with a convertible. We arranged an anemometer next to our parachute that was attached to a dynanometer, The latter one running with the CassyLab software. In the beginning our parachute had holes which surely would be too small. Within the test, we enlarged them until the air resistance was as big as needed.

The test was very succesful. This is what our parachute finally looks like:


Sunday 29 May 2016

Successful Project Day

Today we met in order to successfully complete several aspects of our misssion.

Triggering Mechanism
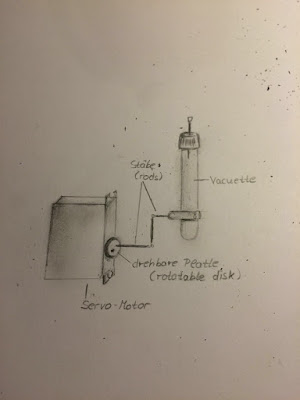
Our final triggering mechanism is composed of a servo motor whose rotation is converted into a linear vertical movement of the Vacuette, which is guided through a mounting. This conveyance is ensured by a fixed split pin. The interaction can be compared to the mechanism of an engine relating to the mechanism of a crankshaft and a connecting rod. The Vacuette is then to be broached by the cannula. In order to seal the Vacuette, the servomotor rotates in the counter direction. To ensure the stability of the system, the cannula is fixed in both vertical directions. A sufficient force exerted by the servomotor is necessary as the membrane is quite hard to be pushed through. This is what we were about to test today. It is proven that the exerted  force is enough. The vacuette moved 0.53 cm what it satisfying as this is a distance we can work with very well. Nevertheless, we modified the servomotor so that it is able to turn 360 degrees and can cover a distance of about 1 cm, even though the opening angle it is not aligned perfectly in the direction of movement. 


Structural Design
Due to the realization of our final triggering mehanism, we were able to completely finish the 3D-mounting of our CanSat. It is going to be printed tomorrow. Aftwerwards, the several components are to be fitted into the can. In case they cannot be perfectly placed into the mounting due to measuring inaccuracies, the 3D model is to be modified.
Video Editing- Team Interview
 The video for our team interview can be found on our youtube channel: https://www.youtube.com/watch?v=Yn8shQxSHdA


Saturday 21 May 2016

team interview, structural design, triggering mechanism

Currently, we are preparing our team interview which will be published on ESA's website in the following weeks. Therefore, we met today and developed a script for the video. We we are going to record it in our project room in the course of the next week.

Generating our CanSat's structural design has been quite productive. We established a CAD-model employing SolidWorks.

Furthermore, we finished the design of our triggering mechanism by finally perfectioning a mecanism in order to effectively transmit the servomotor´s power and convert the rotation into vertical movement. An interaction of fixed split pins can be compared to the mechanism of a crankshaft and connection rods. Consequently, the preproduction model has been optimized. We are going to inform you on the final machanism soon.


preproduction model
sketch of triggering mechanism

Wednesday 11 May 2016

gas chromatograph and data transmission

Today, there was no school for all of us due to oral exams for the graduating students. Therefore, we decided to meet in school and work on our CanSat.

Firstly, we finished the construction of our gas chromatograph which will be used for analyzing the air samples taken by our CanSat. We have ordered a construction kit and already built some parts of the whole arrangement just as the measuring device within the last few weeks.


At the start, we finished assembling and soldering the measuring board:


After we had put together the whole arrangement of the gas chromatograph, we were able to test the program in addition.


The received results are satisfying and showed the functionality of our gas chromatograph (the gas chromatograph's functionality). We will continue to test and to adjust it to our specific requirements in the following weeks.


During the day, we also tested the data transmission between our CanSat and the antenna. We specially focused on checking if the newly bought transmitter and receiver modules work smoothly. Therefore, we created a test program and applied it to a test concerning a distance of 200m.


Finally, we redeveloped our first ideas of our can's interior design.